Showing posts with label diy. Show all posts

Monday, 22 June 2015

Summer 2015 Inspiration Board | LIFE


Hello!


 Okay, I'm going to be completely honest with you and say this inspiration board was a bit of a nightmare to create. I think it's to do with the fact that my brain has been so wired for exams in the last few weeks that it's kind of gone "Creativity? What the heck is that?". Although it may not have the same effect as the Spring Inspiration Board that was previously published (pretty summer-y too, if ya ask me! ;) ), it's something, and I hope you like it!

source (clockwise from top left) 1, 2, 3, 4, 5, 6, 7, 8, 9, 10
Summer screams all things pretty. I'm talking pretty flowers, pretty dresses and pretty fruit! There are a million and one DIY's for summer on Pinterest and a range of pastel colours for your nails just waiting to be painted on. It's a time to wind down, enjoy the sun and also at the back of your mind be wondering how the time of 2015 has flown by so fast that we're already past half way point?

Yesterday, being the official first day of summer and the longest day of the year, it may just have finally hit us that 2015 will soon be over. So make the most of it! :)

What are your favourite things about summer?

Wednesday, 13 May 2015

Spring Festive Décor | featuring EASY DIY


Hello!

" grab a glue gun, some flowers and possibly some fabric to create an array of beautiful Spring decor"

"April Showers bring May's Flowers" is what they say, and as we're in the middle of May, I thought it'd be a nice idea to bring those flowers into our homes. Pinterest is a great source for fun and simple DIY ideas that look super cute - so doing a roundup of a few favourites seemed like such a festive post to write in May.


Ca we just take a moment to look at this. How stunning? Of course, you can use fake flowers if you want it to last longer, but either way, it's so pretty! A hot glue gun can produce masterpieces (though you don't necessarily need a hot glue gun, it looks pretty cool to work with ;) ).


Mason Jar's have made their debut this past year, and I must admit, they're super cute and oh-so versatile! This ombré affect looks wonderful, and the hydrangeas are beautiful. Luckily we have a few hydrangea plants in our garden (see picture here), so as soon as they grow, this will be a lovely way to display them!

"you could totally gift it to someone, and I'm sure they'd love it!"

I have a thing for wooden furniture, and I love the way this looks. In fact, although I'm a bit of a glass fanatic too, the contrast of the modern glass with the wooden piece would look gorgeous (ideas for my future home..).


Have you seen the little hanging succulents around instagram? This reminds me a little of that. Oh, and what cute little way to up-cycle old light bulbs?!

"what better way to make the perfect quote pillow than make it yourself?"

As well as having a thing for wooden stuff, I have a thing for cushions. If you've seen my bed, I have about 7 pillows, which might be a bit excessive for some, but I love it! For those on the same wavelength as me, you can never have too many pillows, right?

Pillows with quotes are lovely and inspiring, and what better way to make the perfect quote pillow than make it yourself? You can choose your own fabric, particular shades of colour and your favourite quote! Using Spring prints and pastel shades will look beautiful during this season!

So why not grab a glue gun, some flowers and possibly some fabric to create an array of beautiful Spring decor to spruce up your home. Even better, you could totally gift it to someone, and I'm sure they'd love it!

Tell me, what are your favourite DIY's to do with flowers? Oh, and your favourite type of flower?

Monday, 20 April 2015

Fuchsia with a bit of Glitter | MANICURE MONDAY


Hello!

"a lovely shade that screams 'ME'"

Spring is well and truly upon us, and if you caught a glimpse of the Spring Nail Colour Picks, and had a little look at the Spring Inspiration Board, you'd know this colour is definitely a go-to Spring shade. Oh, and what better way to spice it up than with a bit of glitter, ey? :)


The combination is one of those, you know, the ones that you do not want to get rid of, even if it's chipping from left, right and centre? Yep, one of those! You can bet your bottom dollar that I'll be wearing this shade, if not the combo, again sometime this season.

"what better way to spice it up than with a bit of glitter, ey? :)"

In all honesty, I was going for the gold glitter, but as I only had a candle lit and the lamp on in my room (you know, to create a nice atmosphere and all), I blindly picked out the silver glitter instead. However, I loved the way it looked - everything happens for a reason, right?! 

All in all, the fuchsia is a lovely shade that screams 'ME'. Shame it was a limited edition, though! Nonetheless, I'll enjoy it while it lasts!

Tell me, if you were to pick one 'ME' shade, what would it be? 

Wednesday, 7 January 2015

Natural Teeth Whitening Kit: Review


Hello!


 Let's get this out there: it is not easy taking photos of teeth. We can now continue..


The teeth whitening kit by Natural Bliss (available here) comes with 3 little pots and a sheet of paper with instructions of how to use it. To be honest, all you need is a toothbrush and you're good to go. It doesn't take too long to do and with a bit of one direction playing in the background to dance along to, the waiting game takes almost no time at all! 


The kit comes with 3 pots with a different ingredient in each. The curcumin didn't do anything special for me, in fact, I almost thought it made my teeth less white. Sodium Bicarbonate is a well know DIY teeth whitener (no surprises that this was a great ingredient) and the willow carbon also worked amazingly well. I'd say the carbon did more for me than the sodium bicarbonate - see the photo below:


Step 1: Apply the Sodium Bicarbonate to your teeth and leave for a bit
   -for me, this worked well but I think my teeth looked extra clean because of the double scrubbing I did, the ingredient in particular was not the miracle

Step 2: Wet a bit of the carbon power and apply evenly, leave for 2 minutes
   -this was the ingredient that stood out for me. I could really tell the difference after the first use of this product. It may be the stark difference between the dark carbon that made me feel my teeth were whiter, or they were actually whiter. Either way, I liked the carbon!

Step 3: Apply the curcumin on to teeth and leave for a while
   -as mentioned previously, I feel like this counteracted the carbon and honestly didn't like it. I also thought it was annoying that it stained my toothbrush. It just didn't work for me. 

Step 4: Brush your teeth clean with water
   -this is where you can taste the curcumin and it's gross. Okay, can you tell I was NOT a fan of the curcumin at all?


Not going to lie, after Day 1, I was super impressed with the teeth whitening kit. My teeth were looking great: super shiny and lovely. The thing is, looking back now I think they might just be that way because I scrubbed my teeth about 4 times, and if you brush your teeth four times within the space of 10 minutes they're bound to look cleaner, right?

After Day 5, I feel my teeth were not as white as they were after Day 1. Contradictory to the whole idea of the kit? Yes. I still feel if I was to use just the willow carbon, the effect would be different. The first two ingredients are definitely worth it - and you're likely to have the sodium bicarbonate at home, so all you need to get is the willow carbon.
None-the-less, the kit is worth it for the willow carbon, and it lasts about 15 days - with each cycle of teeth whitening meant to last 5 days, you can do it 3 times! (yay maths!)

Overall, not bad but I wouldn't say it made a HUGE difference. If you suffer from staining you're more likely to experience better results. If you, like me, have a pretty even(ish) teeth colour and just want a couple of shades whiter teeth, this may not be your best bet.

Do you whiten your teeth? If so, what do you use?

Wednesday, 1 January 2014

New Year: Jar of Goals

Hello!

It's New Year's Day so I thought I'd come to you with a FRESH new idea, for a FRESH new year! Oh my goodness, that rhymes! In my last post I made a rhyme too! I'm on a roll!

Anyway, so for this year of 2014 - which truly did creep up on us - I wanted to have something that would remind me of how I felt at this very moment in one years time! You may or may not remember how you wanted the year of 2013 to turn out,  I don't remember what I was feeling and I didn't really set any goals.

This time I want something to open in one years time to see how far I've come - how much I've changed over time. This idea will allow you to do just this!

You will need:
- A jar (or bottle or container of some sort)
- Paper
- Pen
- The skills to write, fold papers, and open jars!

It's a pretty simple idea, really. Just write your goals/new years resolutions and put them in a jar!

Cut up the paper into the number of pieces you need depending on how many goals you have - I did 12
Write them down - maybe draw an image!
Fold them into whatever you like - I did triangles! 
Put in the jar
For you, this might seem pointless as you can't see the resolutions you've made, but in this case that's not the point. It's just to open in a years time to see if you've overcome/reached the goals and see how much you've progressed.


You may have heard of the 'Memory Jar' where you write something good of the day and put it in a jar to open and read on New Years Eve - I personally can't trust myself to remember to do this, so I feel this is a better idea! However, if you're more committed and have a better memory than I, then feel free to do that. Instead of writing the notes now, do them throughout the year of memories instead of goals!


Well, this is a little extra than just a post saying 'Happy New Year', so I hope you have an idea you can do!
Anyway, wishing you a Happy New Year!!

Friday, 18 October 2013

Weekly Roundup #7

Hello!
Another Friday, another week coming to an end. Is it just me or do you feel that in winter the time seems to speed by, and generally you don't get much done... and you're tired all the time. Okay maybe the last one is just me. ANYWAY, these are some snaps I took recently that roundup... my week!

Favourite Quote: 
HOW CUTE is the Elephanté! Elephants are cute in general! Oh, did you know, an elephant has 5 toes, but not all the toes have nails! Fun little fact for you, there. 
Check out Motivational Monday for more quotes!

Favourite Proud-Moment:
Yes, that's right - I hung that baby up all by myself. My desk is a mess, but that's what happens after some hard work - I did clear it up soon after! Okay, I didn't paint it or anything so I guess I shouldn't be as proud as I am about it, but I actually hung it up - and it's centred in the wall and I used a screw. Gosh I deserve a medal ;) 

Fashion Finds:

Finally, I did a LOT of shopping recently and found that I needed to order another set of hangers in order to fit these in my closet - which there is still a lot of room for more! I don't have that many items of clothing but do mix and match everything so I can get LOADS of different outfits from different combinations of clothes! 
For this seasons trendy outfit ideas click here
Anyway, that's it!
What is your proudest moment from this week? 

Wednesday, 9 October 2013

Get Fall-Festive! - Room Decor


Hello!

October is most definitely among us no matter how unreal it may seem that we're already in the 10th month of the year - so that means you and I need to make our rooms more fit for the cold and cosy months! Do I sound excited through this post to you? Because I am. Believe me.

First, and foremost, the easiest and most simple thing you can do is light a candle. Okay it's not that easy - I mean you have to go out and look for and buy a candle, then come home, put it in a room then light it (gasp) BUT essentially it's a great way to make your room fall festive! This is one I recently bought and lit:


It's a mulled wine and cinnamon apple scent and makes the room smell and feel warm and luxurious! Featured in my book review here - yes I light candles and read books: pure luxury.

Another idea is things to do with Pine Cones.
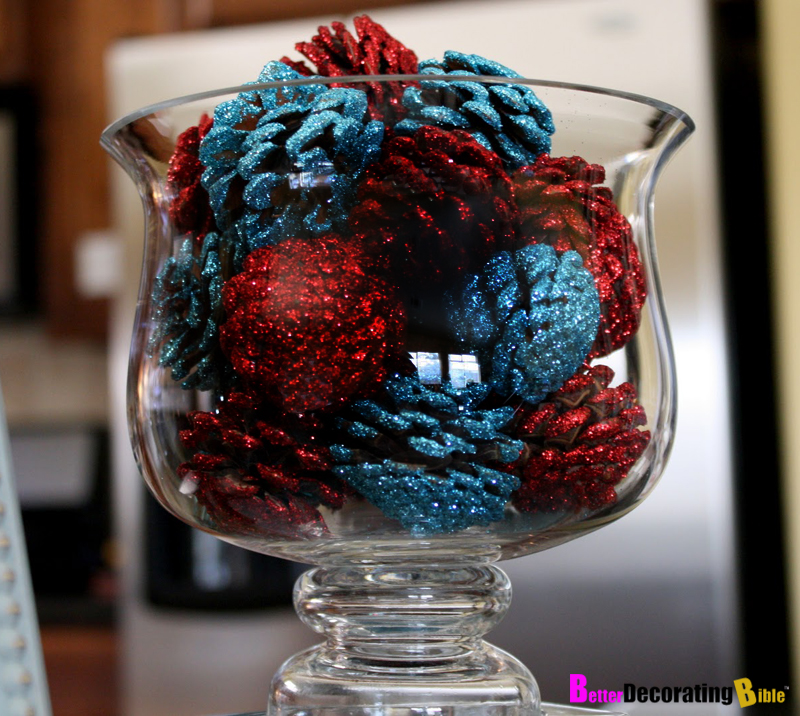
You could decorate them with glitter and put them in a pretty bowl.


source: here
This is so easy to do and you can just get the pinecones for free in a local park (as long as it's permitted). For the longest time, I called these beauties ACORNS not PINECONES and it wasn't until I spent a while google-ing random words to try and find what they are called that I started calling them Pinecones - because that's what they are: Pinecones! Anyway, there's a accessible idea too!

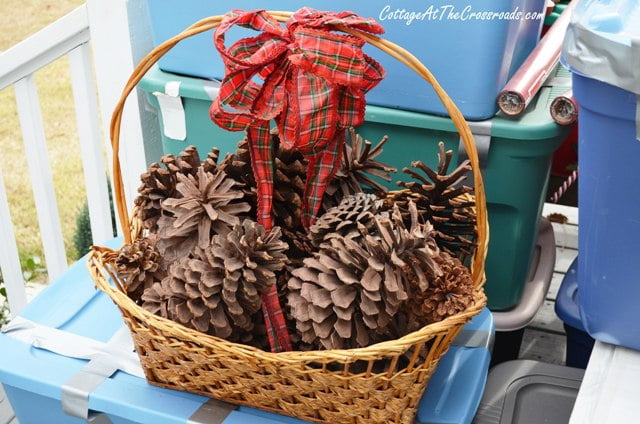
source: here
If you don't want to decorate the pinecones (not called acorns - even though you could also collect acorns to display/decorate) then simply decorate the basket

source: here
source: here


Flowers are not only for summer - warm coloured flowers can be stunners for fall too! Who doesn't love a little bit of florals in their life?! If there really aren't any flowers around, even branches look lovely when displayed right! 

source: here
Adding a knit pillow will bring some cosiness to your room! 

Finally, add some pumpkin to your life. October wouldn't be October without a bit of Pumpkin!

source: here
This image is of a pumpkin covered in stocking! What a great idea! It looks so lovely! I wish England was more pumpkin-festive... not many people around here have pumpkins out during fall! 

Anyway, I hope you have a Fall-festive season and make your room as cosy as possible! 
What are your ideas for fall decor?

Wednesday, 7 August 2013

DIY: Summer-ify Your Notebook

Hello!

Now that I'm on summer vacation, while I've had a lot of 'do nothing' days, I like to be a little more productive: whether that be tidying my room, doing some chores or just catching up on some reading. Sometimes this can be a little harder than you think, especially when you find that there are a lot of things that need to be done, but very few you actually want to do... are you with me on that? ;)


Well, I have always been a fan of writing diary/journal entries since I was quite young (hence why I now have this blog) and thought that I should vamp up a plain notebook for use as my next journal as my current one was coming to a near end, where I shall pack it away my memories....


You will Need:
- Fabric (enough to cover your notebook)
- Glue (I used PVA - try and get some that dries clear)
- Scissors (to cut... obviously)

Method:
- Cut enough fabric to fit the size of your notebook and leave about 2-4cm extra so you can glue it in
- Apply Glue to the notebook
- Carefully stick the fabric onto the notebook
- Fold in the edges and use the scissors to cut off too much excess
- Glue this
- Stick the front and back pages of the notebook to the cover as this would hide the edges of the fabric glued down (I had already written on the front page of my notebook so just got some pink paper, cut to size and did the same kind of thing to hid the excess and make it look neater)
- Leave to dry (mine took a couple of hours, yours may vary depending on the glue/fabric)


That's it! Can you believe that this was once a plain, old, slightly broken, boring black notebook I probably would not have used?! Hey, I guess doing this DIY can save the planet too as it saves paper - see, if I didn't DIY this, I would have bought a new, prettier notebook than the boring, plain one and the boring, plain one would have not been used, hence wasting paper, hence NOT saving the planet!


Doing this was so incredibly easy and there are an endless amount of patterns you can do! I used this lovely floral piece of fabric to create a floral cover for my journal, hence it being Summer-ified! You can add extra 'bling' if you want to or even add some velvet or fur fabric to add texture - hmmm, I think I'll do that next time!


Well, there we go, that's what I DMS (Did MySelf - haha!)...

Okay, well let me know what you'd like me to 'DIY' or DMS (Do MySelf) next time!

Keep Blooming, Berries!
xoxo,
BerryBloomXO

PS. How do you like the new out-ro 'Keep Blooming, Berries!' - creative, huh?? :P
PIN BUTTON